Wednesday, June 30, 2010

WebYaST: Switch from XML into JSON (day two)

Hi!
Today I compared JSON vs XML communication in WebYaST.
And the result is ... there's no big difference for us.
Calling groups index page without profiling takes almost same time with XML or JSON:

JSON
5.59, 5.7, 5.59, 5.82, 6.01 (average 5.742)

XML
5.99, 5.98, 5.88, 6.17, 5.96 (average 5.996)


Comparing processor cycles - JSON is winner, but the difference is not so visible, because there are much bigger time consumers than XML/JSON parsing.
Maybe (as jreidinger suggested) caching on client side could improve the performance ...

Tuesday, June 29, 2010

WebYaST: Switch from XML into JSON (day one)

This week I'll continue on project that started on recent WebYaST Workshop:WebYaST_Performance

Result from previous tests was that bundled reXML parser is slowest from all ;-)
Now I'd like to continue with comparison XML and JSON performance. For this purpose I created webclient json branch in our git repository.


To install profiling extension you'll need to add repository http://download.opensuse.org/repositories/devel:/languages:/ruby:/extensions/openSUSE_11.2
and install package rubygem-ruby-prof. Also to see results from profiling you'll need kcachegrind package.

I started some tests with Firefox firebug extension (5 measurements from each and then calculate average). First one without any modification, then with profiling enabled.

xml (rexml), no benchmarkingxml (rexml), ruby-prof enabled
5.536.3
6.535.71
6.155.79
6.555.78
6.155.99
6.1825.914


On this picture you can see (selected line is xml parsing process) with luck we can speed up 1/5 times (about 1 sec in my case). There's almost no difference between creating json and xml output: Calling http://localhost:4984/groups.xml takes average time 655ms, http://localhost:4984/groups.json takes average time 621.4ms.
In rest-service there are some problems - json output is not valid, jreidinger is working on it.
I'll continue tomorrow.

Tuesday, May 26, 2009

Automatic installation via PXE

This post is more howto than regular blog. I tried to setup PXE based automatic installation server.
There are some docu pages:
http://en.opensuse.org/SuSE_install_with_PXE_boot
http://en.opensuse.org/SDB:Network_Installation_of_SuSE_Linux_via_PXE_Boot
but they're both old and step-by-step doesn't work.


First of all, download openSUSE11.1.iso and create installation source:
wget http://download.opensuse.org/distribution/11.1/iso/openSUSE-11.1-DVD-i586.iso
mkdir /srv/www/htdocs/11.1
mount -o loop,uid=wwwrun openSUSE-11.1-DVD-i586.iso /srv/www/htdocs/11.1


Install apache web server:
zypper in apache2

Configure apache to use symlinks:
in /etc/apache2/default-server.conf, in section <Directory "/srv/www/htdocs">
change "Options None" to "Options FollowSymLinks"
restart apache:
rcapache2 restart

Note: my PXE server mas 172.168.1.1 IP address. PXE client will have 172.168.1.2 IP address and 08:00:27:B9:42:52 MAC address

Install DHCP server
zypper in dhcp-server

Configure DHCP server, to offer PXE, dhcpd.conf:
option domain-name-servers 172.168.1.1;
option routers 172.168.1.1;
default-lease-time 14400;
ddns-update-style none;
subnet 172.168.1.0 netmask 255.255.255.0 {
range 172.168.1.2 172.168.1.30;
default-lease-time 14400;
max-lease-time 172800;
}
group { # id="pxe-client"
next-server 172.168.1.1;
filename "pxelinux.0";
host PXEclient { hardware ethernet 08:00:27:B9:42:52; }
}

rcdhcpd restart


Install yast2-tftp-server and configure tftp service:
yast2 tftp (confirm to create /tftpboot)

Install syslinux and copy into /tftpboot:
zypper in syslinux
cp /usr/share/syslinux/pxelinux.0 /tftpboot/
rcxinetd restart

Copy and configure isolinux:
mkdir /tftpboot/pxelinux.cfg
cp iso/boot/i386/loader/isolinux.cfg /tftpboot/pxelinux.cfg/default

Copy kernel and initrd
cp iso/boot/i386/loader/linux
cp iso/boot/i386/loader/initrd

Edit config file to boot this as default:
/tftpboot/pxelinux.cfg/default:
default linux
label linux
append initrd=initrd splash=silent showopts install=http://172.168.1.1/11.1 insecure=1

implicit 1
display message
prompt 1
timeout 40

Configure your client (in BIOS setup) to "Boot from LAN", "PXE", "network boot" or something similar (depends on BIOS version).
Now we can start installation. On the last dialog, check "create reference profile" checkbox and click OK. When this will be done, copy profile from /root/autoyast.xml on your PXE server as /srv/www/htdocs/AY.xml.

Now you can update your /tftpboot/pxelinux.cfg/default (add autoyast option):
append initrd=initrd splash=silent showopts install=http://172.168.1.1/11.1 insecure=1 autoyast=http://172.168.1.1/AY.xml


Ok, the result is what we wanted:
When you reboot client machine, it will be be automatically reinstalled to default installation (from autoyast profile). If you comment filename option (and restart dhcp server), client machine will only boot into installed system.


I hope it's clean to understand/reproduce and I hope it will help to somebody.
If not, I'm looking for your feedback ;-)

Tuesday, April 7, 2009

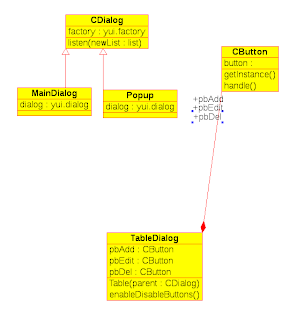
UML diagram of yui objects

Recently I found UML modeling tool - Umbrello. Well, it's not very stable, but there is autosave function ;-)
So I created Class diagram for my small widget_library:


Some objects are missing (work in progress), anyway it's important to visualise objects from begining. It's could be too late when library becomes too complex and relations complicated ...

Friday, March 13, 2009

OOP YaST GUI: event handling

OOP in YaST GUI: Event handling
------------------------------

Hello, here I am again ...

I played with idea of event handling, but if possible better way than we do in ycp now.
Also using inheritance: when you define some behavior, you can inherit class and override handling method or just use objects and handling will be done automatically (using composition).
So the basic idea is that event loop is done automatically and it executes handle function of object that is responsible for such event or which is listening.

Event loop is implemented in parent object (root object in hierarchy - CDialog). Because of this, all inherited objects (MainDialog, PopupDialog) will have this functionality automatically.


class CDialog:
def __init__(self):
self.factory = yui.YUI.widgetFactory()

def listen(self, newList):
self.listeners = newList
etype=-1
while etype!=5:
event = self.dialog.waitForEvent()
etype = event.eventType()
for item in self.listeners:
if (item.getInstance()==event.widget()): item.handle(event)

class CButton:
def __init__(self, factory, parent, label):
self.button = factory.createPushButton( parent, label )
def getInstance(self):
return self.button

...
self.pbAdd = CButton(self.f, hbox2, "&Add")
self.pbEdit = CButton(self.f, hbox2, "&Edit")
self.pbDel = CButton(self.f, hbox2, "&Delete")
...
d.listen([self.pbAdd, self.pbEdit, self.pbDel])
...


When you want to handle something (button click for example), you need to:
- define function that will executed
- connect function to the object
- start event loop with list of "listeners" (objects with connected functions)

There are 3 kinds of functons:
1 - function without any connection to object

self.pbAdd.handle = self.handleAdd

2 - function with connection just to object

self.pbAdd.handle = new.instancemethod(mujhandler, self.pbAdd, self.pbAdd.__class__)

3 - function with visibility outside of the object (example: function can see whole dialog)

self.pbAdd.handle = new.instancemethod(self.handleAdd.im_func, self.pbAdd, self.pbAdd.__class__)


Code is submitted into subversion

How to test this code:
- svn checkout http://svn.opensuse.org/svn/yast/branches/tmp/mzugec/python-yui/
- make sure you have installed packages: python-yui, yast2-libyui, yast2-qt, yast2-ncurses
- run "./main.py" to see Qt version, "unset DISPLAY;./main.py" for ncurses version (unfortunately,in ncurses only way how to terminate application is to kill it, TODO)

Tuesday, February 17, 2009

Object Oriented UI for YaST

Hello!

After my last blog I worked on YaST (what a surprise) and didn't have any time to post anything until now.
Meanwhile I read some chapters from the "Thinking in Java" book. There are some chapters about OOP in general and it brings me to idea, how it would be great in YaST. As a side effect it also means get away from ycp ;-). Thanks to UI independence I can use Python with the YaST UI.

Here's some code example:

widget_library.py:

#!/usr/bin/python
# -*- coding: utf-8 -*-
import yui

class MainDialog:
def __init__(self):
self.factory = yui.YUI.widgetFactory()
self.dialog = self.factory.createMainDialog()
def __del__(self):
self.dialog.destroy()

class Popup:
def __init__(self):
self.factory = yui.YUI.widgetFactory()
self.dialog = self.factory.createPopupDialog()
def __del__(self):
self.dialog.destroy()


class TableDialog:
def __init__(self, d):
self.f = d.factory
vbox1 =self.f.createVBox( d.dialog )
self.f.createVStretch(vbox1)
hbox1 =self.f.createHBox( vbox1 )
self.f.createHStretch(hbox1)
self.f.createHSpacing(hbox1,1)
vbox2 =self.f.createVBox( hbox1 )

self.Table( vbox2 )

vspace =self.f.createVSpacing(vbox1,2)
self.f.createHSpacing(hbox1,1)
self.f.createHStretch(hbox1)
self.f.createVStretch(vbox1)

etype=-1
while etype!=5:
event = d.dialog.waitForEvent()
etype = event.eventType()
self.HandleEvent( event )
print etype

def Table(self,parent):
vbox3 =self.f.createVBox( parent )
self.customWidget(vbox3)
theader = yui.YTableHeader()
theader.addColumn("Targets")
self.table =self.f.createTable( vbox3, theader )
hbox2 =self.f.createHBox( vbox3 )
self.pbAdd =self.f.createPushButton( hbox2, "&Add" )
self.pbEdit =self.f.createPushButton( hbox2, "&Edit" )
self.pbDel =self.f.createPushButton( hbox2, "&Delete")
self.enableDisableButtons()

def customWidget(self,parent):
pass

def HandleEvent(self,event):
if (event.widget()==self.pbAdd):
self.handleAdd(event)
elif (event.widget()==self.pbEdit):
self.handleEdit(event)
elif (event.widget()==self.pbDel):
self.handleDel(event)
self.enableDisableButtons()

def enableDisableButtons(self):
self.pbEdit.setEnabled(self.table.itemsCount()>0)
self.pbDel.setEnabled(self.table.itemsCount()>0)


main.py:

#!/usr/bin/python
# -*- coding: utf-8 -*-
import yui
from widget_library import *

class TargetDialog(TableDialog):
def __init__(self,d):
TableDialog.__init__(self,d)

def customWidget(self,parent):
hbox =self.f.createHBox( parent )
self.f.createInputField(hbox, "Target")
self.f.createInputField(hbox, "Identifier")

def handleAdd(self, event):
print "add target item"
def handleEdit(self,event):
print "edit target item ..."
def handleDel(self,event):
print "delete target item ..."

class MyTable(TableDialog):
def __init__(self,d):
TableDialog.__init__(self,d)

def handleAdd(self,event):
print "adding ..."
TargetDialog(Popup())

def handleEdit(self,event):
print "edit item ..."
def handleDel(self,event):
print "delete item ..."

if __name__== "__main__":
td = TargetDialog(MainDialog())


I know that code is not nice and not very useful, but here's some nice OOP examples:
inheritance, composition, etc ...

Easily put into constructor, what kind of dialog I want:
TableDialog(MainDialog()) or TargetDialog(Popup())

Inherit some class and override methods you want (see MyTable.handle*())
This is much better than generate file from template (as we do now).

I like this way and I'll keep working on it during my ITO.

Bye,
Michal

Monday, August 11, 2008

New YaST2 printer configuration module

Today I submitted new version of yast2-printer (2.17.2). This version contains big (major) changes. It uses Johannes Meixner's code from Build service, based on some ideas to improve current status.


Please anybody interested in improving current status of printing configuration - test it and give me (any) feedback.

Thank you,
Michal